Showing posts with label studio art. Show all posts

How to Draw Facial Proportions

https://youtu.be/1kHzAh9sCH4
Step-by-step video
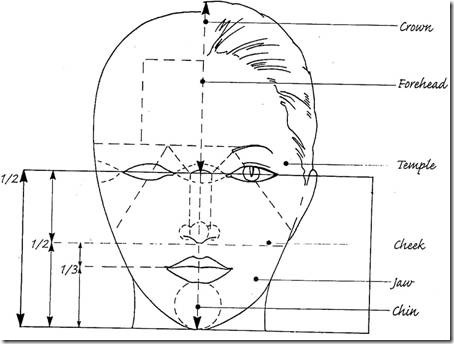
Her tutorial covers the basic guidelines for facial proportions. Learning where features are placed on the face and how to use our pencil as a measurement tool allows us to create more accurate portraits. In this video, I am using a plain old HB pencil! Try to stay within the HB-2B range for general sketching. Too hard of a graphite (the higher the H, the harder the graphite) is really light and can indent the paper easily if you press too hard. The higher the B, the softer the graphite, which will create darker marks!
More resources: https://www.whataportrait.com/blog/best-drawing-tutorials/

Watch videos about famous portrait painters:
Kehinde Wiley On President Obama's Official Portrait
Kehinde Wiley
Who was Frida Kahlo
Who was Vincent VanGogh
https://www.youtube.com/watch?v=vBLvusSwHRk


Anime resources:


Assignment #2:
Choose 1 Option: use value shading or color
1. Draw a Self-portrait using a mirror to look at
2. Use a photograph of someone you wish to draw
3. Draw an Anime portrait cartoon portrait - must have a face
4. Hero's Journey is a comic strip drawing for advanced students who already know how to draw portraits.
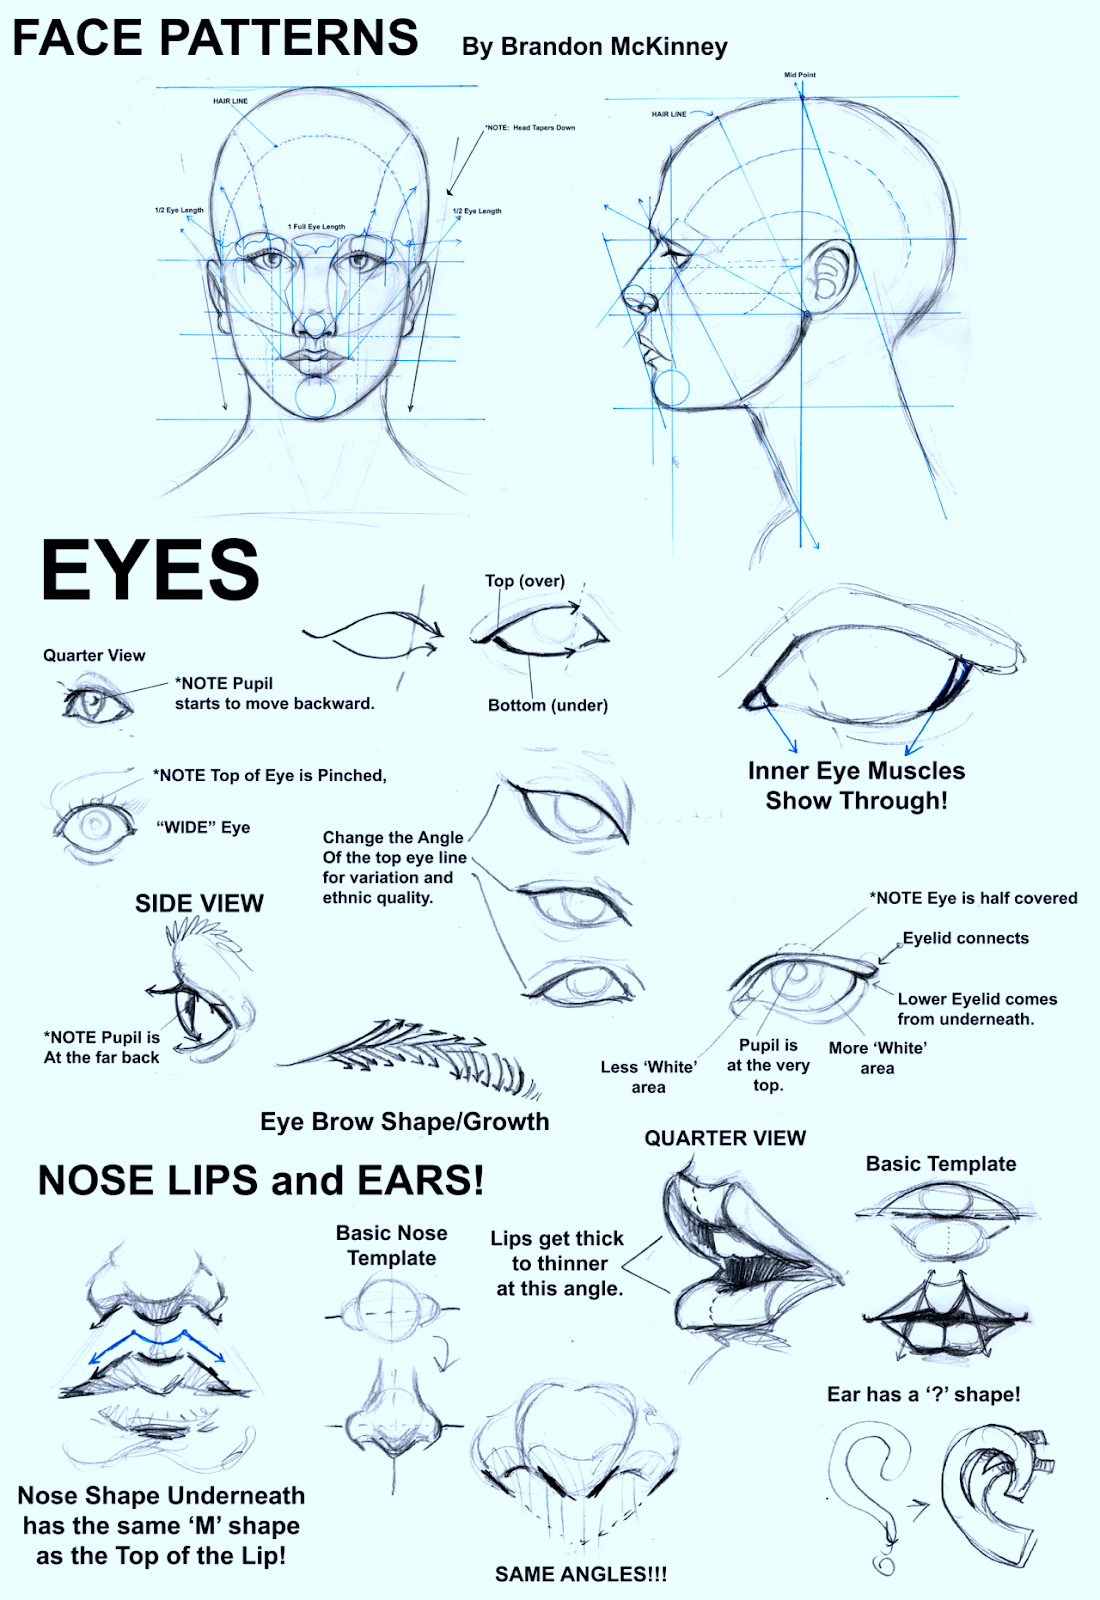


Nice Examples:


Studio Art Public Art Project


Music & Art

Art History - Emotion Unit


Video: https://youtu.be/8n9BzzWy4zY

Japanese & Chinese Brush Painting

Gelatin Printmaking


Gelatin printmaking is a form of monoprinting, meaning each print you pull is unique. No two prints are the same. The process of creating, problem solving, and experimenting is more important than the final outcome.

How to Make a Gelatin Printing Plate
Materials:
   Knox Gelatin
   Water
   Glycerin (optional but recommended)
   Shallow Pan
   Bowl
Note: It is possible to make a gelatin plate without using glycerin. However, the gelatin plate will not last more than a day or two without the glycerin.
Instructions:
First, decide what size pan you wish to use. Be sure to select a container that has a smooth bottom. I used a glass 9 x 13 inch dish.
Once you have selected your pan, measure how many cups of water it takes to fill it about 1 inch thick. My pan needed 4 cups of water.
Use the following recipe ratio to figure out how much gelatin and glycerine you will need.
Recipe Ratio :: 2 Tablespoons of Gelatin per 1 cup of liquid (divided between glycerin and hot water)
(One package of Knox Gelatin contains approximately 1 Tablespoon of gelatin mix).
To fill our 9 x 13 pan, I used eight packages of Knox Gelatin with 2 cups of glycerin and 2 cups of hot water.
Step 1: Pour 2 cups of glycerin in a bowl and sprinkle in 8 packages of gelatin. Stir gently.
Step 2: Add 2 cups of hot (boiling) water. Gently stir until the gelatin has dissolved.
Step 3: Slowly, pour the gelatin mixture into a pan. You can pop any bubbles that occur after pouring but don’t worry too much about the bubbles, the top of the pan will be the bottom of your printing plate.
I transferred the mixture to cooke sheets lined with parchment paper to make them a little thinner. Allow the gelatin to set for at least one hour.
Once the gelatin has completely set, use a knife to loosen the gelatin around the edges of the pan and slide out the gelatin plate. Line each layer of gelatin with parchment paper so they don't stick together. Try making bigger batches if you're using them with an art class.
***My Studio Art classes completely destroyed the plate after 1 day so I had to reconstitute the gelatin.  I microwaved the broken pieces for about 2 1/2 minutes stirring half way. I did 2 batches to microwave the entire amount. Then you follow the same steps as above.


What I like most about gelatin printmaking is layering the different techniques on top of each other. Try layering the first and second technique on one piece of paper. My students learned about Negative Positive Space and how to use construction paper to mask off areas. Other students tried 2 colors and a screen printing like technique. 


Magazine Bowls

For this project, you can use any type of recycled paper. Magazines and catalogs.

Glue the Strips into Coils: After you have made a few dozen paper strips, you can begin forming coils. It does not matter if you don't have enough strips for the entire bowl because you need to let it dry in stages so the coils do not simply fall off.Gluing the paper strips can get a bit messy, so before your proceed, you should protect your work surface. Depending on how wide you want the coils to be they need to be cut and folded all the same to keep them consistent. The larger coils take much longer to do but look nice as the base or to mix up with in the sides of the vase.

Before opening your glue, blow up and tie off a balloon. I think small round balloons work best, but use whatever shape or size you want for your project - it's yours! Then, place the balloon, tied side down, on top of a glass. -- You do not have to use a balloon to create the shape. For more directions click here:  

3D Form Nylon Sculpture