World's Greatest Toy PBL 8th Grade


The Problem
You are a toy designer hoping to launch the next great toy that will be popular for years to come.  What direction should you take in the design of this toy, and why will children be drawn to it?

The Big Question:
How do you come up with the “perfect toy”?
Students will review the history and future of toys, and use that information to come up with a design plan for their own “perfect toy”.


Activity: Divide students into small groups, and each group will act as the Design Team working on the “perfect toy.” They must come up with an overall description of the toy, including its features and details. The groups must also be able to present their new toy to representatives of a toy company (i.e. fellow students)and explain why it will be successful with today’s children. The groups will also draw a sketch showing the basic design of the toy.


Full lesson and resources:

video

National Art Standards
Anchor Standard 1: Generate and conceptualize artistic ideas and work.
8th : Document early stages of the creative process visually and/or verbally in traditional or new media.
Anchor Standard 2: Organize and develop artistic ideas and work.
8th : Demonstrate willingness to experiment, innovate, and take risks to pursue ideas, forms, and meanings that emerge in the process of art-making or designing.
Anchor Standard 3: Refine and complete artistic work.
8th : Apply relevant criteria to examine, reflect on, and plan revisions for a work of art or design in progress.
Anchor Standard 5: Develop and refine artistic techniques and work for presentation.
8th : Collaboratively prepare and present selected theme-based artwork for display, and formulate exhibition narratives for the viewer

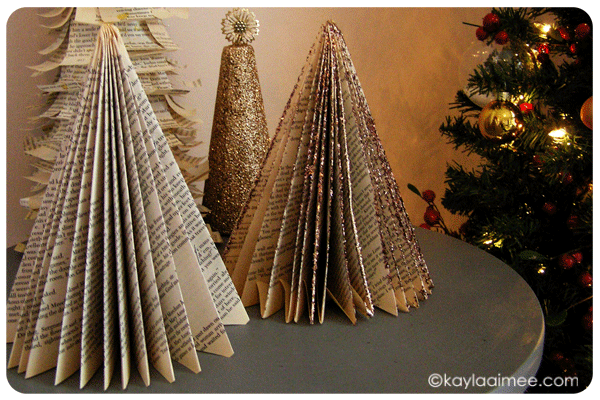
8th Grade Festive Christmas Trees for the Library

How To: Make A Paperback Christmas Tree

How To: Make A Paperback Christmas Tree, how to make a christmas tree from a paperback book 


Rustic Burlap Christmas Trees 
You can use decorative cones like these or paint Styrofoam cones.

Made with strips of burlap 
OR 
YOU CAN USE OLD BOOK PAGES which is what we used


8th Grade Computer Op Art


Title: 8th Grade Computer Op Art
Objective: Students will use Adobe Photoshop to create a computer Op Art Design.

Essential Questions:
Who’s artwork should go on display for the art show? Why? What criteria should be used in order to decide?
Which of Victor Vasarely’s computer art do you like the best? Why?

National Art Standards
Anchor Standard 2: Organize and develop artistic ideas and work.
8th : Demonstrate willingness to experiment, innovate, and take risks to pursue ideas, forms, and meanings that emerge in the process of art-making or designing.
Anchor Standard 4: Select, analyze, and interpret artistic work for presentation.
8th : Develop and apply criteria for evaluating a collection of artwork for presentation.

Vocabulary:
Op Art was from the mid 20th century
The goal of Op Art is to create the illusion of movement and three-dimensionality. Also to fool the eye.

Resources:
https://www.youtube.com/watch?v=cA6IuAaE9Pk&safe=active  * Instructional Step-by-Step Directions.
to finish we ended the video at 5:24 minutes, then we created a new layer, clicked on the gradient tool to choose our own gradient, use your cursor to click in the corner hold down the mouse and drag it to the other corner, select the opacity of the gradient layer and change it to around 50%. We had to resize the image to 8 inches by 8 inches.
Other resources:

We looked at the artist VICTOR VASARELY http://www.op-art.co.uk/victor-vasarely/


Dale Chihuly - Glass Inspired Art

Cooperative, Collaborative Student Installation


Dale Chihuly
http://www.chihuly.com/


He had a car accident in the 1970s where he lost most of his vision in his left eye. He has teams of people who help him create his art pieces.
Dale Chihuly: Beyond the Object

---------------------------------------------------------------------------------------------------
Corning Glass Museum in Corning, NY (2 hours South of Syracuse)
http://www.cmog.org/

past exhibit artist: http://www.cmog.org/collection/exhibitions/masters-studio-glass-zynsky
---------------------------------------------------------------------------------------------------
http://www.glassblowingshop.com/
Lake Placid, NY
---------------------------------------------------------------------------------------------------
ART LESSON:
Art materials:
acrylic paint (or color sharpies)
paint brushes
water buckets
clear plastic solo cups or clear plastic bottles (make sure to cut the bottle in half and only use the bottle half)
cookie sheet covered with aluminum foil
oven

Directions:
Use color sharpies to color the inside of the cups or bottles OR if you don't have color sharpies use acrylic paint to paint the inside.

***Think about your color selection. Do you want WARM COLORS or COOL COLORS?

Let dry

Place cups or bottles on cookie sheet covered with aluminum foil in a pre heated oven at 350 degrees for 1-2 minutes. Make sure to watch them.

Use tongs to take them out of the oven. You can use the tongs to change the shape a little bit.

The shape will be unpredictable and it's hard to control what shape it melts into.